
Method
This section covers vacuum bagging methodology, including layup techniques and bagging the workpiece. It also covers a newer vacuum bagging method called vacuum infusion.
Layup
The key to a good layup is to have as much prepared ahead of time as possible. Having all the gear on hand, the material cut, and a well thought out system, are key components of a successful layup job.
A solid work surface is very helpful. I used a 2'x8' piece of plywood as my workbench. Plastic was stretched over the wood and clamped down to provide a clean work surface that won't absorb epoxy or allow the material to stick to the work surface.
The workpiece also needs to be setup in a secure work area. In the case of the rudder, the rudder post provides a convenient clampdown bar. For the daggerboard I put nails in each end of the foil and built a stand to hold the foil, trailing edge down. For the spars I made a stand out of 2x4s. Its important, for the spars, to make sure the stand is straight and level since any wiggles or dips in the stand will be transfered to the work piece.
Other materials needed are; a good supply of latex gloves, a squeegee, a long sleeve shirt (to keep the epoxy off), and paper plates. I use paper plates for mixing the epoxy because plastic mixing containers are a pain to clean out. Paper plates can be thrown out and they are just the right size and shape for mixing. Avoid wax mixing cups since the wax breaks off and gets into the epoxy, weakening it.
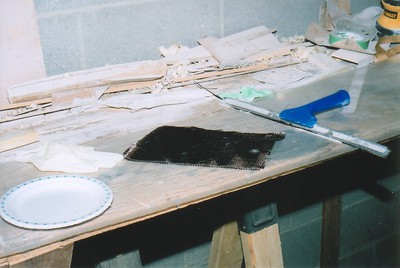
Cut the cloth out ahead of time. To do this work, use a pair of fabric scissors. Be careful when slicing up the fabric, to not pull the weave to much. Especially with carbon fibre, the fibre tends to pull apart making it a real pain to work with.
Once the material is all cut and sitting ready, its time to start the layup. Make sure you don't start too late as the next few steps can take quite a lot of time.
Lay out a strip of material on the workbench. Mix up a batch of epoxy in your mixing container. I found about 4 ounces per time was about the right quantity. Mix in the catalyst, use your fingers here. Mix for about 30 seconds or so. You can see when the catalyst starts to disappear into the mixture if you have good light. Then spread the epoxy over the material. Dump some epoxy on, then spread it around with your hands. Make sure the material is throughly saturated. Flip it over and repeat, then squeegee off as much epoxy as possible. There's a thin line between leaving too much or too little epoxy on the material. Excess epoxy will generally be squished out through the peel ply when the vacuum is applied, so err on the side of too much but try not to be wasteful either.
Once the material is prepared, peel it off the workbench carefully and carry it to the workpiece. Carefully lay it down on the workpiece, then smooth out the material, working out any air bubbles or wrinkles.
Repeat this process until all the material is used. You'll find that after about 2-3 hours of layup, using slow curing epoxy, the epoxy will start to set. Fast curing epoxy will leave about an hour to do layup. When the epoxy starts to set its time to stop layup and start bagging. Working much longer than this will result in the inner layers of the layup having mostly set by the time the vacuum is applied.
Bagging
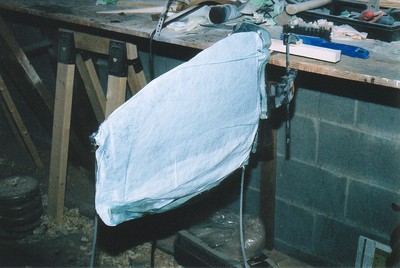
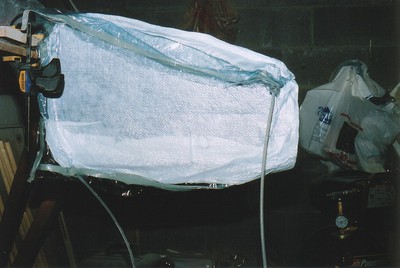
To vacuum bag a part, after the layup is performed, a number of layers of special material need be added. Then plastic is wrapped around the workpiece and sealed, and the vacuum is applied.
On top of the wet layup put peel ply. Peel ply is a nylon material with lots of pin holes in it. This means the excess epoxy can squeeze through it, but it won't stick to the project so it will peel off easily after the epoxy has set. Be careful when applying the peel ply as any wrinkles in the cloth will show up imprinted into the work piece.
On top of the peel ply goes breather cloth. Breather cloth is a material that looks like cotton batting used in quilts. When it is compressed it still leaves room for air to flow through it. This insures that the vacuum is distributed evenly over the work piece.
Wrap strips of breather cloth around the ends of the vacuum tubes and tape them so the tubes can't slip free and the breather cloth is in contact with the rest of the breather cloth wrapped around the workpiece. This will insure that when the vacuum is applied, the plastic won't seal to the end of the tubes, preventing the air from being removed from the bag.
Finally the plastic is put over everything. Its very important to ensure that there are no holes. Even very small creases, pinholes, and folds can result in it being impossible to achieve any vacuum. Be especially careful to seal the area around the tubes where they enter the bag. I purchased some bagging tape which is similar to sticky plasticine or bubble gum. It made the job of sealing much easier because I could quickly seal the bag, then go back over the seal stretching the plastic where there were wrinkles and squishing the tape around to fill the fold. I also used clear packing tape when preparing the bags ahead of time. I found packing tape to be too error prone when I was in a rush, and tired, after doing the layup.
Below you can see what a rudder looks like while being vacuum bagged.
To check if the epoxy is set, flex a bit of the layup that hangs off the edge, preferably a part that will be cut off later. Flexing the layup like this weakens the bonds and wrinkles the finish so don't do this test on a critical part of the work.
Once the epoxy has set (generally 4-8 hours, depending on temperature and epoxy), turn off the vacuum, cut the hoses (they can't be pulled from the bagging tape, its too sticky), and unwrap the workpiece. Its a good idea to remove the breather cloth and peel ply at this stage. If the peel ply gets left on until the epoxy has fully cured it is much harder to remove.
Cut off any excess material with a pair of strong scissors. This will reduce the amount of material that has to be sanded or sawed off at considerably more effort later. If you do find yourself in the position of needing to slice off excess carbon after its cured, I've found that a 24tpi metal-oxide blade works best. In a jigsaw or hacksaw, one of these blades will make quick work of any slicing jobs that need doing.
The workpiece is now done. As an optional last step, it can be post-cured by placing it in an oven or some sort of heated box and baked. Sources I have read suggest the hotter the better (up to ~1500�C), and that 200�F is a manageable goal (ie: in an oven), though anything above room temperature has a positive effect. Be careful to not heat items that are sealed since air expands when its heated which will result in the workpiece splitting open. Post-curing will increase the workpiece's final strength. Leave the work piece for a couple of days to fully cure and its ready to have the finishing touches put on.
An Alternate Method -- Vacuum Infusion
Vacuum infusion is a method where the material is laid out and then bagged. When all is ready the vacuum is applied and then epoxy is sucked into the layup.
I haven't performed any vacuum infusion myself, though I plan to. This information is here as a place where I can collect this information before I give it a go. From my experiences with the other boat stuff, I'll certainly be trying this with polyester resin and fibreglass layups first, scaling up to larger layups before I try making all carbon parts.
I've found two good articles on vacuum infusion. One is excerpted from an article in the CanoesLetter a few years ago. It has some interesting ideas; using peel ply to slow the spread of the resin at the edges of the work to even out the flow at the end, and the use of felt as a "vacuum reservoir" to avoid the need to add extra vacuum outlets in places that might otherwise be cut off from the vacuum source. The hulls described in the article are carbon with balsa cores. [article in .pdf]
The other article is from a vacuum bagging materials supplier and describes the process in a more hypothetical way. The diagrams in this article are invaluable for understanding exactly what the CanoesLetter article is talking about. [article in .pdf]