Preparation
To get organized to build the daggerboard you need templates and a blank.
The templates can be made from any solid material. If you plan on using them again making them out of plastic might be a good idea. The material needs to be stiff enough so it won't flex while you are using it. Paper does not work well because it flops around while you're trying to line it up. I used construction paper but really this was still too floppy.
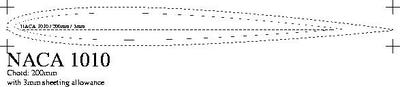
Information on the foil cross sections is widely availably courtesy of a great deal of research that has been done for model airplanes. Many of these airfoil sections are symetrical and therefore useful for daggerboards as well. The two most commonly used sections for foils are the NACA 0010 and Selig Donovan(SD) 8020. I used the SD8020 but from looking at them I can't see the difference, which indicates I can't really manufacture the details in enough fidelity to make a difference. The differences are in the order of 0.00086 in. or 21µm along the leading edge profile - very small indeed.
Professionally made foils frequently have CNC machined aluminium molds and are built from two halves from the skin inwards to achieve tighter tolerances. This is an interesting option but a 3-axis CNC machine is a project in and of itself (or a lot of cash). As a result I tried to get the foils as close as I could to the shape of the template and that will have to do.
Templates can be printed out using the handy program PlotFoil which is available for Unix and DOS. You can find a link to the program and more information here, or a local copy here if that link stops working. The coordinates can also be got from the UIUC Airfoil Data Site, as well as a number of other useful and interesting links to foil research and design.
Two templates are needed; one of the finished cross section of the foil, and one of the cross section of the core (the foil minus the carbon and filler). PlotFoil makes this very easy.
If you are interested in playing around with foil shapes, or to get a feeling for how complicated it is, try out XFoil. XFoil is a Unix and Windows program that performs simulations of laminar and turbulent flow over foil cross sections. You can find XFoil here, or a local copy here if that link stops working. The relevant Renold's numbers are in the range of 5,000 to 2,000,000 for a daggerboard with a max chord of 250mm. There is some disagreement on the angle of attack (ie: leeway) to use, but 4.5° seems to be fairly common. Its interesting to simulate at what angle the foils will start ventilating. If you actually want to learn something about it in detail, start with these articles: [PDF 1] [PDF 2], and after you've got your head above water again, start looking for some text books.
Once the templates are done, the blank needs to be made. Rip a Poplar board of the right width, thickness, and length into 2" strips. (I used Poplar, see Planning and Materials for an explanation.) Flip alternating strips end for end. This way as the wood dries it will tend to cancel out its own warp. Now epoxy the strips back together into the original board.
Finally we are ready to start making the actual daggerboard.
[TODO sketch illustrating how the blank should be put together
How Long, How Much?
How much time, effort, and money will a daggerboard consume? Well, not too much it turns out. A daggerboard makes a good project to start with if you haven't had much epoxy or wood working experience. There aren't any complicated fiddly bits so its possible to focus more on the workmanship.
[TODO table of cost goes here]
| Time | |
| Wood Blank | 10 hours |
| Preparing Carbon | 2 hours |
| Layup and Vacuum Bagging | 6 hours |
| Fairing and Polishing | 14 hours |
| 32 hours |
Core
The core is made by clamping the blank to a table or workbench, then shaving the blank down to shape.
Carefully trace out the core templates onto the top and bottom of the blank. Then trace the outline of the foil onto the blank. Use a jigsaw to slice off the excess material.
To make sure that the leading and trailing edges are lined up top to bottom, such that there is no twist in the foil, mark a center line along the leading and trailing edges of the blank.
Now take the hand plane and work down the board roughing out the shape of the foil, using the templates along the way to check your progress. If the hand plane is sharp this should be an almost effortless process. As the foil gets close to the correct shape reduce the amount of material removed by the hand plane.
The final stage is do a quick, rough sanding of the foil to remove any remaining ridges that might have been left by the plane. When the core is done shine a light from one end of the core. Slide the templates down the core and check that there are no spots that don't match the template, indicated by light coming through under the template.
If too much material gets removed, apply thickened epoxy and sand it down to the shape required by the template.
Skin
The skin is made from a three layers of carbon fibre. The first two layers are unidirectional carbon. The first layer is at 45° to the leading edge. The second layer is at 90° to the first layer. These are put on such that none of the first layer overlaps itself (0% overlap), and similarly none of the second layer overlaps itself. Finally a layer of carbon cloth is applied on top with the weave aligned at 0°/90° to the leading edge.
This layup should result in a skin that is three layers of carbon thick.
Descritions I have read on the internet advocate tapering off the quantity of carbon near the tip of the foil to improve gust response. I have not done this due in part to the very narrow foil chord on International Canoes. A flexing daggerboard will contribute considerably to leeway so I'd rather have one that is too stiff.
Once each layer of carbon has been soaked in epoxy and squeegeed out, it is applied to the core and then vacuum bagged. For details on the vacuum bagging method see Vacuum Bagging
Fairing, Finishing, and Polishing
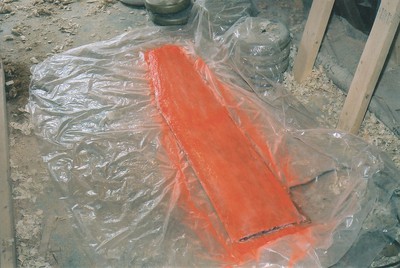
Once the vacuum bagging is completed, remove excess carbon using a pair of sicsors. If this is done before the epoxy is fully cured the job will be much easier. Trim the trailing edge to extend to the edge of the final template, not the core template. This will result in a much stronger trailing edge.
To fair the daggerboard to its final shape apply two to three coats of thickened epoxy to the foil on each side. Then spray paint the foil a nice contrasting color and take a sander to the epoxy. Sand until all of the paint has been removed. Be careful not to sand through to the carbon fibre. Now take the templates for the final shape of the foil and do some detailed sanding to make them match. The light trick mentioned previously works beautifully for this. Don't worry about fine sanding, 60 grit is about right.
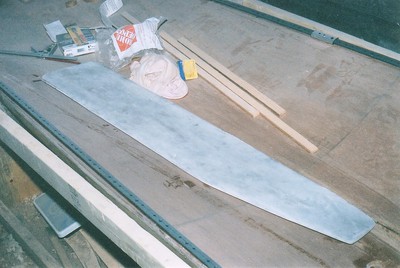
Finally apply two coats of neat epoxy to the foil on each side. I added graphite to turn the epoxy black. This fills all the little scratches left by the heavy sanding. The end result looks better if you sand between coats.
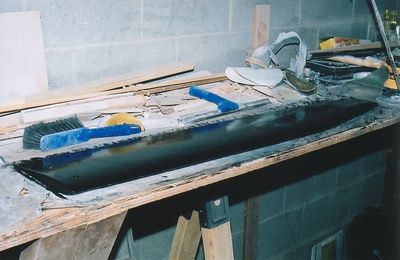
Sand the foil with 220 grit paper to remove any waves left from the final epoxying (a random orbital sander or a long sanding board does wonders here). Now get out your wet sand paper and work your way down from 400, to 600, to 1200 grit. The end result is a very smooth foil. Sand from leading edge to trailing edge so that any small scratches left at the end will be in the same direction as the flow of the water, resulting in a minimal amount of turbulence.
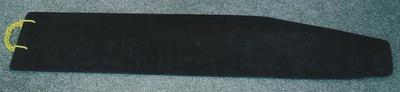
Drill some holes for a handle and seal them with epoxy. Make a handle out of some rope and its done!