
[TODO still need to finish section on fittings]
[TODO add info on calculating stiffness (need to find out how), use info from proctor site: http://www.proctormasts.co.uk/carbon/section.asp?Section=Series+3 ... what is cm^4 stiffness measurement, how is it calculated? also info on weight, dimensions and cross-section. info on booms too: section 76 boom! ]
The Big Picture
Doing the spars; mast, boom, and bow sprit, in carbon fibre, is a considerably different job than the rest of the work to put this boat together. Tubes are particularly hard to do in a vacuum bag because they are long and cylindrical, which makes for a lot of surface area that is hard to work on when time gets tight as the epoxy starts to dry.
The upside of doing home made spars is that they are considerably cheaper than purchasing from a manufacturer.
A key point to keep in mind is that the stiffness of a spar is porportional to the cross-sectional area of the spar and the number of layers of carbon in the layup. This means that if a spar is half the diameter it will be four times as flexible. To correct for this, four times the number of layers of carbon will need to be used in the smaller spar to achieve the same stiffness as the original spar.
A General Outline
The way spars are made, in brief, is as follows:
A core is made from cheap foam. The layup is wrapped around the core, a layer of carbon cloth, a layer of unidirectional carbon spiralling up in each direction with a 50% overlap, then another layer of carbon cloth. Then the foam is melted out of the mast since it provides no additional strength.
The unidirectional carbon takes most of the loads. The carbon cloth keeps the unidirectional carbon in column when its under load.
The devil is of course, in the details:
- Carbon should be added where fittings will go, to spread the loads.
- Kevlar should go anywhere wear is expected, for example the inside of the tube if internal halyards are to be used.
- Fibreglass should be used to isolate the mast from other materials like metal fittings.
- Aluminium should be avoided like the plague since it reacts catalytically with carbon.
- Any fittings that come in contact with the mast should be coated in epoxy first.
- Stainless steel or carbon fittings are best.
[TODO add sketch of layers]
How Long, How Much?
I received quotes for my mast from Proctor that ran ~$1850 for an aluminium one and ~$2450 for a carbon rig, excluding taxes and freight. I originally estimated that the materials would cost about $800 for the carbon and $200 for epoxy to do the mast. This left me with the possibility of messing it up completely three times before I should have just forked over the money.
With money as an incentive I set out on this little project. I hadn't counted on the work taking as long as it did though. With out these spars, I could probably have been out on the water by the end of last summer, had I continued working through the summer.
Boom
[TODO table of cost goes here]
| Time | |
| Foam Core | 6 hours |
| Fibreglassing | 5 hours |
| Preparing Carbon | 5 hours |
| Layup and Vacuum Bagging | 8 hours |
| Clean up | 6 hours |
| 30 hours |
Bow Sprit
[TODO table of cost goes here]
| Time | |
| Foam Core | 8 hours |
| Preparing Carbon | 2 hours |
| Layup and Vacuum Bagging | 8 hours |
| Clean up | 2 hours |
| 20 hours |
Mast
[TODO table of cost goes here]
| Time | |
| Foam Core | 10 hours |
| Fibreglassing | 15 hours |
| Preparing Carbon | 6 hours |
| First Layup and Vacuum Bagging | 12 hours |
| Mast Track | ? hours |
| Second Layup and Vacuum Bagging | ? |
| Clean Up and Cut Track | ? |
| 43+? hours |
Cross-Sections
Designing spar cross-sections is an extremely complicated operation. Along the lines of graduate level mechanical engineering work. So I've opted for the trial and error method.
For the mast I have rough data on the stiffness of Proctor D masts and I know what the cross-section looks like. [TODO grab this from my notebook.] If the spar is too flexible I can add more carbon without too much trouble.
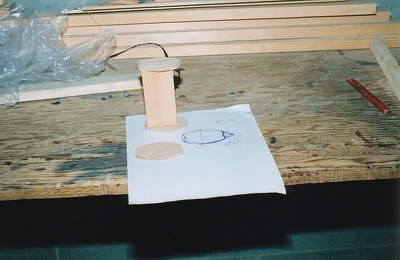
To make templates for the spars, draw the cross-section out on paper. Take a thin piece of plywood and trace out the shape twice. Use a jig saw to roughly slice out the shape, leaving a millimetre of space around the template. Then use a file to shave the two templates to the exact shape. By clamping the two templates together, exact duplicates can be made.
Core
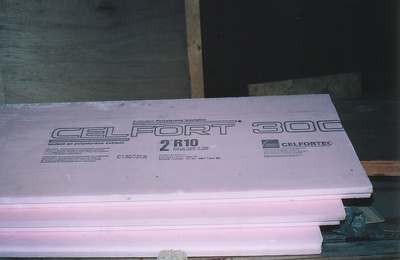
For constructing the core cheap foam is used. This is because it isn't a part of the final product and only forms a male mold around which the spar can be built. I used Celfortec R10 polystyrene foam, found at HomeDepot. Do Not use polyurethane foam because it gives off toxic fumes when cut.
Glue the sheets of foam together to achieve the necessary thickness. Contact cement is great for this job since it allows the pieces to be lined up and slapped together. Be sure to get the contact cement that won't melt polystyrene.
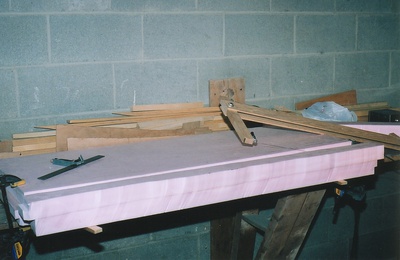
Next slice the sheets into rectangles of roughly the correct dimensions. Use wood rails clamped to the foam sheets as a template for the hot wire cutter to slice out straight blocks of foam. Then use a square to cut the ends to be exactly 90 degrees. Its important to get this part as perfect as possible since its very hard to straighten out later if you have a couple of sections that are off by a degree or two. Cut the foam to be lengths that are workable with the width of the hot wire cutter.
Take the templates and put two finishing nails through each one. Then carefully line up the templates on each end of the foam blanks and stick them into the foam.
Now fire up the hot wire cutter and slice each section out by tracing out the template. It takes a bit of practise and a steady hand to get good clean cores. I found that clamping the bow to the workbench and repeatedly taking slices out of the foam with a cross-section of roughly one square inch worked best. Removing the spring and tightening down the wing nuts on the bow reduced the amount of vibration in the wire, which led to much cleaner cuts.
The last step is to glue all the individual cores together to form the end result. This is easy, with a bit of contact cement, if the ends were carefully cut earlier. If the ends are not perfect, they can be trimmed using a jig and the hot wire cutter or with a file. Neither way gives a very satisfactory result, so do it right the first time.
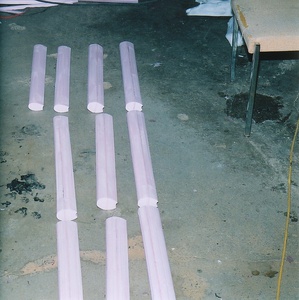
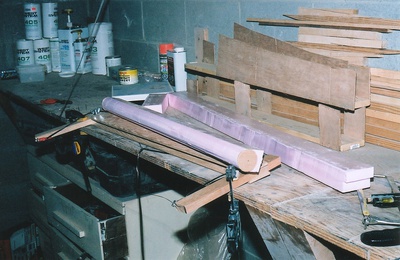
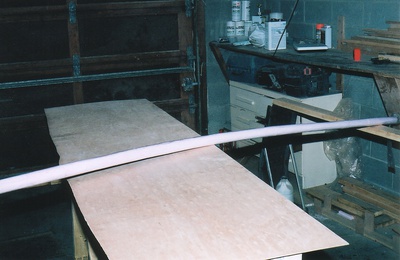
In the case of the mast, since it was so long, I found it easier to glue it together in two stages, to make it easier to work with. First, three cores were contact cemented together and a few layers of fibreglass were applied to stiffen them. Then the three sections were carefully lined up, so as to be as straight as possible, contact cemented together and the gaps were fibreglassed.
The fibreglass was applied by laying up two layers on the front of the mast, then sanding down the rough edges when it dried, flipping it over and applying two layers to the trailing edge.
If you look carefully at the picture above, you can see that the cores on the left are tapered. I've chosen to make a mast with a tapered top section. It remains to be seen how well this works.
Skin
The core of the skin is unidirectional carbon. The unidirectional carbon is wrapped around the mast so that there is a 50% overlap; half the width of the material overlaps the previous wrap. This results in two layers of carbon at 45� to the vertical, twisting around the spar. Then another layer of unidirectional carbon is wrapped around the mast in the opposite direction. This means the fibres of the second layer are at roughly 90� to the first.
On both the inside and outside of the unidirectional carbon is carbon cloth. The purpose of the cloth is mostly to hold the unidirectional carbon in column, so that it does not buckle and separate when it takes on load.
Finally there are additional layers of kevlar and fibreglass on the inside and outside to protect the spar from the beating it will take out on the water and in the dingy yard.
Carbon fibre is affected by ultra violet rays so its important to protect the carbon fibre from the sun. Most commercial carbon masts are varnished, since varnish has sun block like SPF qualities, but allows the proud owner to see the carbon. Many home made masts are painted grey or white to reduce the heating effect of the sun on the spar as well as protect it directly.
Variations -- Learning the Hard Way
In some ways this section is more or less a catalogue of the things I did wrong. Things to avoid the next time around. There are lot of them since none of the spars came out perfectly the way I wanted. This is not to say that they were beyond repair, since I didn't have to scrap any of them, but next time I build one, the quality will be much higher.
Listed here are the variations I tried with each spar.
Boom
The layup used from inner to outer layer was: 1 layer of fibreglass on the core, kevlar, carbon cloth, unidirectional carbon wraps, carbon cloth, and kevlar.
The single layer of fibreglass wasn't stiff enough on the foam core, so when the vacuum was applied the foam compressed. This meant the layup was no longer tight around the core and as a result the spar has a lot of wrinkles running along its length. This is not critical strength-wise, just ugly. In addition the yellow kevlar on top of the black carbon resulted in a spar that is an ugly army green colour.
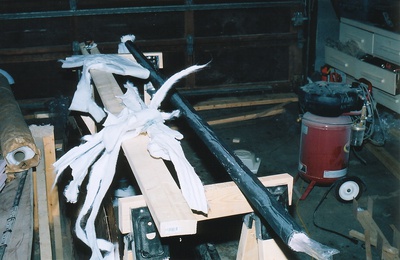
During the layup I found the best way to get the unidirectional carbon on was to get it all epoxied up, then roll the boom down the workbench at the correct angle and work it tight with my hands. This method worked reasonably well, but may have contributed to some of the wrinkling since the unidirectional carbon may not have been as tight on the core as it could have been.
This spar is ugly but very functional. It is extremely stiff. Placing the ends on sawhorses I can bounce on the middle with my full weight and it flexes no more than a few millimetres. This stiffness is a fairly desirable quality in a boom. The stiffness of the spar is largely due to its large diametre. I made this spar 100mm by 80mm, where the maximum diameter from the rules is 100mm.
On the end of the boom that goes up against the mast, where the gooseneck connects, the boom was made so that the end is folded in to close it off. In this way a hole just needs to be drilled for the pin of the gooseneck, rather than having to build a plug to go in the end of the boom.
[TODO add sketch of boom cross-section]
Lesson learnt: A core that won't compress is the key to a good result.
Bow Sprit
The layup used from inner to outer layer was: no layers of fibreglass on the core, kevlar, carbon cloth, unidirectional carbon wraps, and carbon cloth.
In an attempt to avoid the problem with the core completely, for the bow sprit I tried to use a layer of plastic around the foam core so I could vacuum bag the skin, without compressing the foam. This turned out to be an utter disaster since as I was doing the layup the plastic on the core got who knows how many nicks in it and I couldn't get any vacuum at all when it came time. In the end I had to make a last minute bag to go over everything and vacuum bag it the same way I did the boom.
In addition, without the fibreglass to stiffen the foam core, the core was very floppy. This meant that as I was wrapping the unidirectional carbon onto the core it was being loosened off again by the bend in the core.
The end result was a tube with a lot of big wrinkles.
This tube ended up being very flexible too since I made it 50mm in diametre so it would fit in the hole I made in the bow. From the rules I mentioned above, to get this tube to be as stiff as it should be I probably need to add 3 more layers of unidirectional carbon: half the diametre, four times the carbon.
So this tube isn't a complete write off because I have to add more carbon to it anyways to make it stiff enough. At the same time I can fill some of the wrinkles using fibreglass or filler. In the end this tube should work out, but there's still a lot more work to be done.
Lesson learnt: Make the hole match the pole, not the other way around. Also, stiffer is better for the core. Two layers of fibreglass is a good idea.
[TODO add sketch of cross-section]
Mast
The mast cross section is made to be ??mm x ??mm with a tapered section above the hounds. The mast track is 5/8"(??) fibreglass tube, with a wall thickness of 3mm(??) glued to the mast. [TODO]
The layup used from inner to outer layer was: 2 layers of fibreglass on the core, kevlar, carbon cloth, unidirectional carbon wraps, carbon cloth, and fibreglass. The last, outer layer of carbon cloth is not added until the mast track has been glued on and filled along the sides. At the same time extra reinforcement was added where fittings will go and down at the base of the mast in the form of extra carbon cloth patches.[TODO update this when the mast is done!]
The mast turned out reasonably well, except that I did too much in the layup. When I went to vacuum bag, the layup was almost set and the trailing edge of the mast almost ended up being left open. Using the vacuum I managed to pull the trailing edge shut. It was close though. The end result is a mast with an excellent leading edge, very smooth and a great layup, and a trailing edge thats a bit mucked up. [TODO add what ever I end up doing for real]
Lesson learnt: Don't try to stretch out the layup phase to get just a "a couple more layers" done. Bag it when its time.
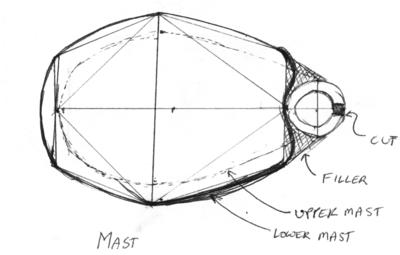
Finishing Details
Once the spar construction is finished the final touches can be added. Remove the foam core and add the fittings.
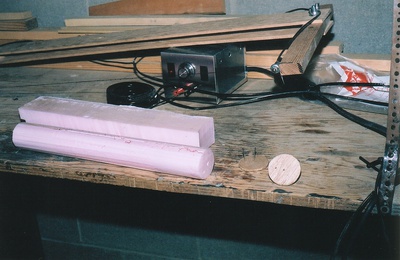
The foam can be removed since it provides no structural strength to the spar and is sure to start taking on water as it breaks down after being in the water for a bit. To get rid of the foam pour acetone down the tube. The foam will melt nicely and a pink bubblegum goop will come out the other end. Acetone will not damage the epoxy. It may be necessary to use a long stick to poke a hole in the contact cement if it created a dam across the whole cross-section of the spar.
Boom
fittings and holes
Bow Sprit
fittings
Mast
mast track
fittings